Integrating the Winter Wedding Shadow Box Paper Cut into Your Creative Workflow
In the realm of personalized gifting and bespoke home décor, the transition from digital concept to tangible artifact requires precision, patience, and the right assets. For crafters, small business owners, and DIY enthusiasts, finding a design that balances aesthetic appeal with technical feasibility is often the most challenging part of the process. The Winter Wedding Shadow Box Paper Cut represents more than just a decorative item; it is a structured resource designed to streamline the creation of high-quality 3D light boxes. By understanding how this specific template fits into your broader creative workflow, you can reduce preparation time, ensure consistency in output, and deliver a professional-grade product whether for personal use or commercial sale.
Understanding the Asset Structure and Compatibility
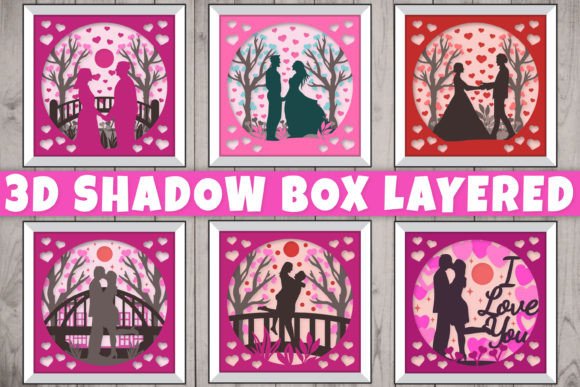
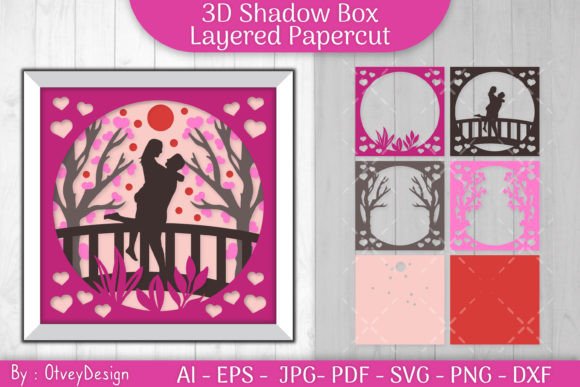
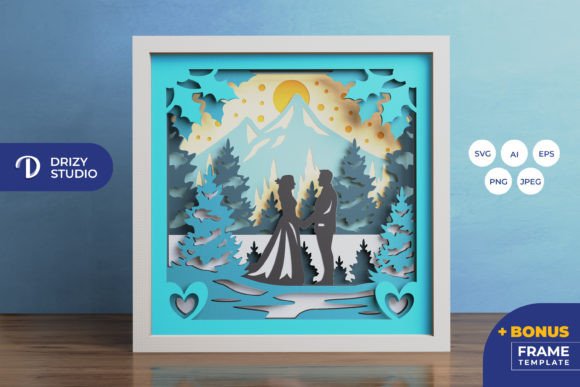
Before initiating any physical production, it is crucial to evaluate the digital assets provided. This template is not merely a single image but a layered system comprising eight distinct layers, each contributing to the depth and narrative of the final piece. The design features a wedding couple within a winter-themed setting, optimized for a square format of 20.32×20.32 cm. Understanding the file formats included—AI, EPS, PNG, SVG, and JPEG—is essential for integrating this asset into your existing software ecosystem.
For users operating within vector-based workflows, such as Adobe Illustrator or CorelDRAW, the AI and EPS files (714 x 714 px) offer scalability without loss of quality. These formats are ideal for those who may need to adjust specific anchor points or modify elements before cutting. Conversely, the SVG file is the cornerstone for users relying on electronic cutting machines like Silhouette or Cricut. The inclusion of SVG ensures compatibility with most modern cutting software, allowing for precise path recognition. It is important to note that while SVG files can be resized, maintaining the aspect ratio is critical to preserving the alignment of the eight layers. Deviating from the original proportions can result in misalignment during assembly, compromising the 3D effect.
Preparation and Material Selection
The success of a paper-cut shadow box relies heavily on the preparation phase. Unlike flat prints, this project demands careful consideration of material weight and opacity. Since the design utilizes eight layers, using paper that is too thick can make folding and gluing difficult, while paper that is too thin may tear during the weeding process or fail to hold its shape when stacked. Cardstock ranging from 160gsm to 200gsm is typically recommended for such projects, providing enough rigidity to stand upright within a frame while remaining pliable enough for intricate cuts.
Color selection also plays a pivotal role in the visual outcome. The preview images serve as a guide, but the final product’s appearance will vary based on the paper color and lighting conditions. For a winter wedding theme, whites, creams, and soft blues are traditional choices, but experimenting with contrasting colors can highlight specific layers. If you plan to convert this into a light box, consider using translucent vellum for certain middle layers to diffuse light evenly, creating a softer glow around the central figures. This stage of planning ensures that the materials you procure align with the technical requirements of the Winter Wedding Shadow Box Paper Cut, minimizing waste and rework.
Execution: Cutting and Weeding Techniques
Once materials are prepared, the execution phase begins. For those using cutting machines, loading the SVG file into your software allows you to map each layer to specific cut settings. It is advisable to perform test cuts on scrap paper to calibrate blade depth and pressure, ensuring clean edges without cutting through the backing mat. Precision here is paramount; jagged edges or incomplete cuts will be visible once the layers are assembled and illuminated.
For artisans preferring manual methods, the provided PNG and JPEG previews (3000 x 2000 px for high-resolution reference) can be printed and used as guides for art knives and scissors. This approach requires a steady hand and a sharp blade, particularly for the intricate details of the wedding couple and surrounding winter elements. Regardless of the method chosen, organization is key. Labeling each layer immediately after cutting prevents confusion during assembly. Given the complexity of an eight-layer design, keeping the pieces in sequential order reduces cognitive load and streamlines the subsequent steps.
Assembly and Structural Integrity
Assembly transforms individual components into a cohesive three-dimensional artwork. Using glue or double-sided tape, each layer must be adhered with precise spacing. Foam tape or spacers are commonly used to create the necessary depth between layers, enhancing the 3D illusion. When applying adhesive, focus on the structural points rather than covering entire surfaces, which can cause warping or visible residue. Start from the background layer and work forward, ensuring each subsequent layer aligns perfectly with the previous one.
This stage also offers an opportunity to integrate lighting. Adding LED strips between specific layers can dramatically enhance the visual impact, turning the shadow box into a luminous centerpiece. However, wiring must be planned carefully to avoid obstructing the design or creating bulk that distorts the frame. Concealing wires within the frame’s edge or behind thicker layers maintains a clean aesthetic. Testing the lighting setup before final sealing allows for adjustments to brightness and color temperature, ensuring the winter theme is conveyed effectively through cool or warm tones.
Quality Control and Final Presentation
Before considering the project complete, a thorough quality control check is necessary. Inspect each layer for stray adhesive, dust, or misalignments. Ensure that the lighting functions consistently and that no shadows are cast unintentionally by loose wires or uneven spacing. The final product should be housed in a deep-frame shadow box that accommodates the total depth of the eight layers plus spacers. Glass or acrylic fronts protect the delicate paper from humidity and physical damage, extending the lifespan of the piece.
For professionals selling these items, consistency across multiple units is vital. Documenting your process, including cut settings, adhesive types, and assembly techniques, creates a standard operating procedure that ensures every Winter Wedding Shadow Box Paper Cut meets the same high standard. This documentation also aids in scaling production, allowing for delegation or faster replication during peak seasons such as Valentine’s Day or wedding seasons.
Long-Term Value and Versatility
Beyond its immediate use as a wedding gift or décor, this template offers long-term value through its versatility. The modular nature of the design allows for customization. Users can alter color schemes to match different seasonal themes or event palettes without changing the underlying structure. Furthermore, the skills developed through this project—precision cutting, layer management, and lighting integration—are transferable to other papercraft endeavors, enhancing overall creative capability.
Whether you are a hobbyist looking to create a meaningful gift for family or a small business owner expanding your product line, the Winter Wedding Shadow Box Paper Cut provides a robust foundation. By treating the template as a component within a larger workflow rather than a standalone task, you maximize efficiency and quality. The combination of digital precision and manual craftsmanship results in a unique artifact that resonates emotionally with recipients while showcasing technical proficiency. Embrace the process, respect the details, and let the layered depth of the design tell its story.