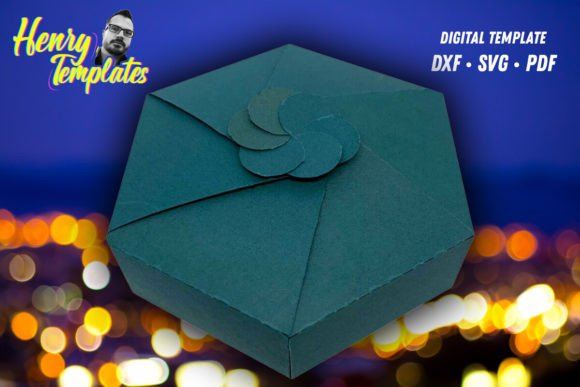
Mastering the Art of Digital Gifting with Lace Box SVG Files
In the evolving landscape of digital crafting, the intersection of precision cutting and elegant design has created a new standard for handmade gifts. Among the most sought-after projects for modern crafters is the creation of intricate paper lace boxes. These delicate containers transform ordinary treats or small tokens into luxurious presents, all thanks to the power of vector-based cut files. Whether you are a seasoned professional running an Etsy shop or a hobbyist looking to elevate your holiday card game, understanding how to utilize a Lace Box design file is essential.
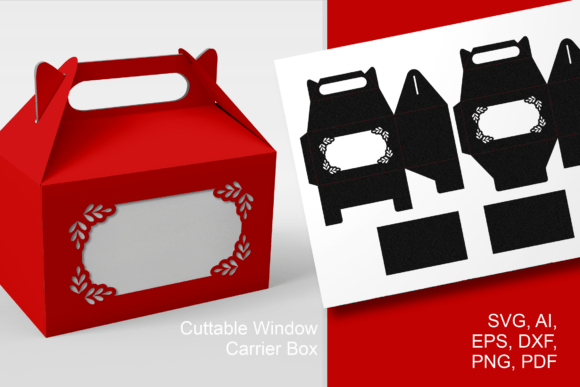
The versatility of these digital assets lies in their compatibility. A high-quality download typically includes multiple formats—SVG, DXF, PDF, and PNG—ensuring that no matter which machine sits on your desk, you can achieve professional results. This guide explores the practical nuances of working with these files, focusing on workflow efficiency, material selection, and the specific steps required to bring a flat sheet of cardstock to life as a three-dimensional masterpiece.
Understanding File Formats and Machine Compatibility
Before diving into the cutting process, it is crucial to understand why file format matters. Not all cutting machines speak the same digital language. The inclusion of SVG, DXF, and PDF files in a single package is not just a bonus; it is a necessity for a seamless user experience across different ecosystems.
- SVG (Scalable Vector Graphics): This is the gold standard for users of Cricut Design Space and Silhouette Studio Business Edition. SVGs retain their quality at any size and often come with pre-separated layers, which is vital for complex designs like lace patterns where score lines and cut lines must be distinguished clearly.
- DXF (Drawing Exchange Format): Ideal for users with the basic version of Silhouette Studio or other CAD-based cutting software. While they lack the layering convenience of SVGs, they are universally recognized by vector programs.
- PDF: Often overlooked, the PDF file serves two critical purposes. First, it allows for manual tracing if your software struggles with the vector files. Second, and more importantly, it provides a visual reference for assembly, showing you exactly how the final Lace Box should look when folded.
For Cricut users, there is a specific protocol to follow. Most premium design bundles include a folder labeled SVG_Cricut. Inside, you will find notes that are critical for success. These notes often contain specific settings recommended by the designer, such as blade depth, pressure settings, and multi-cut requirements. Ignoring these instructions can lead to incomplete cuts or torn paper, especially with intricate lace details.
The Importance of Pre-Cut Preparation
Success in paper crafting is determined before the blade ever touches the mat. When working with a Lace Box design, the complexity of the cut path requires a stable environment. Start by selecting the right material. Heavyweight cardstock, ideally between 80lb and 110lb, provides the structural integrity needed for the box to hold its shape while being thin enough to fold cleanly along score lines.
Adhesion is another common pitfall. Because lace designs involve many small, disconnected pieces, a standard grip mat might not hold the paper securely enough. Using a LightGrip or even a StandardGrip mat that has been cleaned thoroughly is recommended. Some crafters even use a brayer to ensure the paper is firmly bonded to the sticky surface. This prevents the "shifting" effect, where the paper moves slightly during cutting, resulting in jagged edges or misaligned score lines.
Navigating the Cutting Process
Once your material is prepared and your file is uploaded, the next step is configuring your machine settings. This is where the distinction between cut lines and score lines becomes paramount. In a well-designed Lace Box SVG, these elements are often color-coded or layered separately.
- Upload and Inspect: Open the SVG in your design software. Check for any stray points or open paths that might confuse the machine. Ensure that the score lines are set to "Score" and not "Cut."
- Layer Management: If the design includes multiple components, such as a base, a lid, and decorative overlays, keep them grouped but distinct. This allows you to cut them from different colors of paper if desired.
- Test Cut: Always perform a test cut on a scrap piece of the same paper. Lace patterns are dense; if the blade drags or tears the paper, you may need to reduce the pressure or increase the number of passes.
For users of Scan-N-Cut machines, the process involves scanning the printed template or importing the SVG directly via USB or Wi-Fi. The advantage here is the ability to see the cut path on the screen relative to the paper placement, which can save material. However, the principle remains the same: precision is key.
Assembly Techniques for Professional Results
Cutting is only half the battle. The transformation from a flat, perforated sheet to a sturdy Lace Box requires patience and the right tools. Rushing this stage can result in cracked folds and a sloppy finish.
Begin by gently removing the cut pieces from the mat. Use a spatula or a weeding tool to lift the corners, avoiding pulling the paper upwards, which can distort the delicate lacework. Once freed, lay the piece flat on a clean surface.
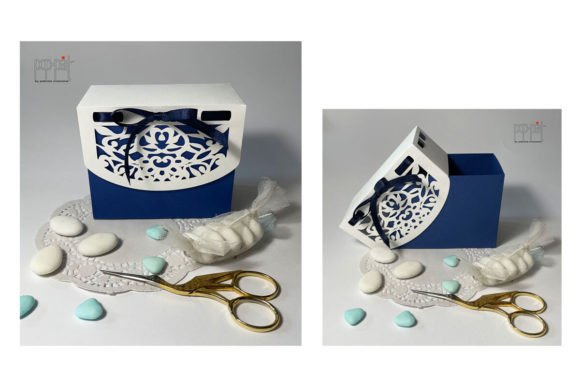
Bone folding is the secret weapon of professional paper crafters. Using a bone folder or a dull butter knife, crease every score line firmly. Do this before attempting to assemble the box. Pre-creasing ensures that the folds are sharp and uniform, giving the final product a crisp, manufactured look rather than a handmade appearance. Pay special attention to the tabs used for gluing; these need to be folded precisely to ensure a strong bond.
When applying adhesive, less is often more. Liquid glue offers the strongest bond but requires drying time. Double-sided tape is faster and cleaner but can add bulk. For a Lace Box, a fine-tip liquid glue applied sparingly to the tabs is usually the best choice. It allows for slight adjustments during assembly and dries clear, preserving the aesthetic of the delicate cutouts.
Integrating Lace Boxes into Modern Workflows
The appeal of the Lace Box extends beyond personal hobbies. For small business owners, these designs offer a high perceived value with low material costs. They are perfect for packaging jewelry, chocolates, wedding favors, or corporate gifts. The ability to customize the design by changing paper colors or adding ribbons allows for endless variation without needing new digital files.
Moreover, the trend towards sustainable gifting supports the use of paper-based packaging. Unlike plastic containers, a beautifully crafted paper box is part of the gift itself. Recipients are likely to keep and reuse these boxes for storage, extending the lifecycle of your creation. This aligns with the growing consumer demand for eco-friendly and thoughtful presentation.
When marketing these items, highlight the intricacy of the laser-like cut quality achievable with home machines. Show behind-the-scenes videos of the cutting process and the satisfying assembly. Transparency about the effort involved justifies the price point and connects emotionally with buyers who appreciate craftsmanship.
Troubleshooting Common Issues
Even with the best files, issues can arise. If your Lace Box cuts are not clean, check your blade. A dull blade will tear rather than cut, ruining the delicate bridges in the lace pattern. Replace blades regularly, especially when working with abrasive materials like glitter cardstock.
If the score lines are too deep and cut through the paper, reduce the pressure setting on your machine. Conversely, if the folds are not crisp, increase the pressure slightly or run the score tool over the line twice. Remember, every machine and material combination is unique, so keeping a log of successful settings for specific paper brands is a wise investment of time.
Ultimately, mastering the Lace Box is about balancing technical precision with artistic vision. By respecting the capabilities of your machine, following the designer’s notes, and taking care during assembly, you can create stunning, professional-grade packaging that elevates any occasion. The digital file is just the blueprint; your skill brings it to life.